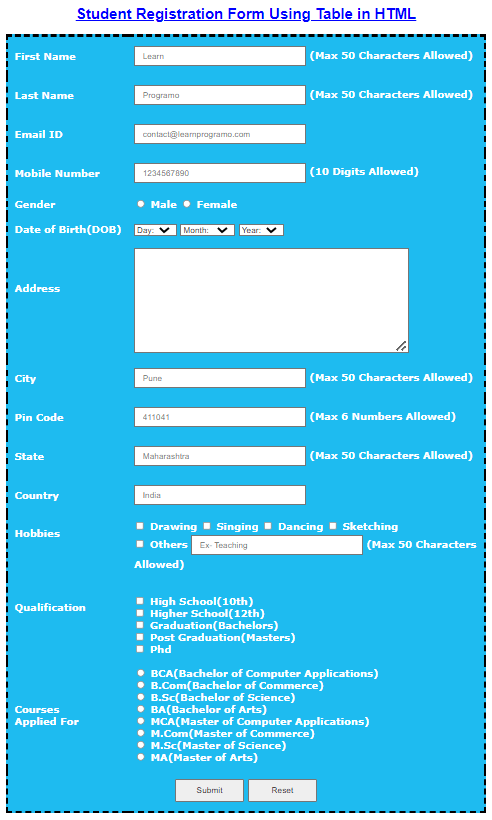
In this tutorial, we’re going to learn how to create a student registration form in HTML with CSS and also we’ll design a student registration form in HTML and CSS with downloadable source code.
Our HTML form will consist of the following main HTML fields, which must necessarily be filled out before submitting the form. The field names such as First name, Last name, Email Id, Mobile Number, Address, Hobbies, Course, Gender, Date-of-birth, etc are used in the registration form.
So, we’ll start designing cool registration form using HTML(hypertext markup language) and CSS(cascading style sheets). We’ve also added two HTML buttons i.e submit and reset. The submit button will perform submitting action after clicking on it. Similarly, if the user wants to clean all the fields data then the reset button will erase all the data after clicking on it.
So, let’s start designing the registration form using HTML with CSS:
Table of Contents
How to Create Student Registration Form in HTML with CSS
Before creating the actual HTML file you’ve to choose a suitable HTML code editor such as VS Code, Sublime Text editor, Atom, etc. In this tutorial, we’ll use VS Code IDE to create a student registration form in HTML with CSS. In this form, we’ve used the following HTML fields such as:
- Textbox
- Textarea
- Radio Buttons
- Date
- Number
- Tel
- Checkbox
- Dropdown
- Password
- Button etc.
In this project, we’ve used internal CSS methods to style the Html form. We’ve added a <style> tag inside the head tag for the styling of the HTML form. If you want to use inline CSS then you just have to copy all CSS code and paste it into a separate file called style.css. After that link that CSS file to HTML file using the <link> tag.
HTML Table Tags to Create Student Registration Form
In this project, we’ve used some table tags such as:
- <th> which defines the header cell in the table.
- <tr> which defines the header row in the table.
- <td> defines a cell in a table.
- <caption> defines a table caption.
With the help of these tags, you can also add some extra functionalities to the table. You can also modify the table by adding some extra functionality in this form which will enhance your skills in HTML and CSS.
HTML Code for Student Registration Form
So, here is the full source code of the entire Student Registration Form in HTML with CSS. If you need a quick code then just press the copy code button which is on the right top side of the code editor. If you want to download the whole code then the download button is given at the end of this tutorial.
//Learnprogramo - programming made simple
<html>
<head>
    <title>Student Registration Form Using HTML with CSS</title>
    <style>
        h2 {
            font-family: Sans-serif;
            font-size: 24px;
            font-style: normal;
            font-weight: bold;
            color: blue;
            text-align: center;
            text-decoration: underline
        }

        table {
            font-family: verdana;
            color: white;
            font-size: 16px;
            font-style: normal;
            font-weight: bold;
            /* background: linear-gradient(to bottom, #33ccff 0%, #ff99cc 100%); */
            background: #1EBBF0;
            border-collapse: collapse;
            border: 4px solid #000000;
            border-style: dashed;

        }

        table.inner {
            border: 10px
        }

        input[type=text],
        input[type=email],
        input[type=number] {
            width: 50%;
            padding: 6px 12px;
            margin: 5px 0;
            box-sizing: border-box;
        }

        input[type=submit],
        input[type=reset] {
            width: 15%;
            padding: 8px 12px;
            margin: 5px 0;
            box-sizing: border-box;
        }
    </style>
</head>

<body>
    <h2>Student Registration Form Using Table in HTML</h3>
        <table align="center" cellpadding="10">
            <!--------------------- First Name ------------------------------------------>
            <tr>
                <td>First Name</td>
                <td><input type="text" name="FirstName" maxlength="50" placeholder="Learn" />
                    (Max 50 Characters Allowed)
                </td>
            </tr>
            <!------------------------ Last Name --------------------------------------->
            <tr>
                <td>Last Name</td>
                <td><input type="text" name="LastName" maxlength="50" placeholder="Programo" />
                    (Max 50 Characters Allowed)
                </td>
            </tr>
            <!-------------------------- Email ID ------------------------------------->
            <tr>
                <td>Email ID</td>
                <td><input type="email" name="EmailID" maxlength="100" placeholder="contact@learnprogramo.com" /></td>
            </tr>
            <!-------------------------- Mobile Number ------------------------------------->
            <tr>
                <td>Mobile Number</td>
                <td>
                    <input type="text" name="MobileNumber" maxlength="10" placeholder="1234567890" />
                    (10 Digits Allowed)
                </td>
            </tr>
            <!---------------------- Gender ------------------------------------->
            <tr>
                <td>Gender</td>
                <td>
                    <input type="radio" name="Gender" value="Male" />
                    Male
                    <input type="radio" name="Gender" value="Female" />
                    Female
                </td>
            </tr>
            <!--------------------------Date Of Birth----------------------------------->
            <tr>
                <td>Date of Birth(DOB)</td>
                <td>
                    <select name="BirthDay" id="Birthday_Day">
                        <option value="-1">Day:</option>
                        <option value="1">1</option>
                        <option value="2">2</option>
                        <option value="3">3</option>
                        <option value="4">4</option>
                        <option value="5">5</option>
                        <option value="6">6</option>
                        <option value="7">7</option>
                        <option value="8">8</option>
                        <option value="9">9</option>
                        <option value="10">10</option>
                        <option value="11">11</option>
                        <option value="12">12</option>
                        <option value="13">13</option>
                        <option value="14">14</option>
                        <option value="15">15</option>
                        <option value="16">16</option>
                        <option value="17">17</option>
                        <option value="18">18</option>
                        <option value="19">19</option>
                        <option value="20">20</option>
                        <option value="21">21</option>
                        <option value="22">22</option>
                        <option value="23">23</option>
                        <option value="24">24</option>
                        <option value="25">25</option>
                        <option value="26">26</option>
                        <option value="27">27</option>
                        <option value="28">28</option>
                        <option value="29">29</option>
                        <option value="30">30</option>
                        <option value="31">31</option>
                    </select>
                    <select name="BirthdayMonth" id="Birthday_Month">
                        <option value="-1">Month:</option>
                        <option value="January">Jan(1)</option>
                        <option value="February">Feb(2)</option>
                        <option value="March">Mar(3)</option>
                        <option value="April">Apr(4)</option>
                        <option value="May">May(5)</option>
                        <option value="June">Jun(6)</option>
                        <option value="July">Jul(7)</option>
                        <option value="August">Aug(8)</option>
                        <option value="September">Sep(9)</option>
                        <option value="October">Oct(10)</option>
                        <option value="November">Nov(11)</option>
                        <option value="December">Dec(12)</option>
                    </select>
                    <select name="BirthdayYear" id="Birthday_Year">
                        <option value="-1">Year:</option>
                        <option value="2022">2022</option>
                        <option value="2021">2021</option>
                        <option value="2020">2020</option>
                        <option value="2019">2019</option>
                        <option value="2018">2018</option>
                        <option value="2017">2017</option>
                        <option value="2016">2016</option>
                        <option value="2015">2015</option>
                        <option value="2014">2014</option>
                        <option value="2013">2013</option>
                        <option value="2012">2012</option>
                        <option value="2011">2011</option>
                        <option value="2010">2010</option>
                        <option value="2009">2009</option>
                        <option value="2008">2008</option>
                        <option value="2007">2007</option>
                        <option value="2006">2006</option>
                        <option value="2005">2005</option>
                        <option value="2004">2004</option>
                        <option value="2003">2003</option>
                        <option value="2002">2002</option>
                        <option value="2001">2001</option>
                        <option value="2000">2000</option>
                        <option value="1999">1999</option>
                        <option value="1998">1998</option>
                        <option value="1997">1997</option>
                        <option value="1996">1996</option>
                        <option value="1995">1995</option>
                        <option value="1994">1994</option>
                        <option value="1993">1993</option>
                        <option value="1992">1992</option>
                        <option value="1991">1991</option>
                        <option value="1990">1990</option>
                        <option value="1989">1989</option>
                        <option value="1988">1988</option>
                        <option value="1987">1987</option>
                        <option value="1986">1986</option>
                        <option value="1985">1985</option>
                        <option value="1984">1984</option>
                        <option value="1983">1983</option>
                        <option value="1982">1982</option>
                        <option value="1981">1981</option>
                        <option value="1980">1980</option>
                    </select>
                </td>
            </tr>
            <!------------------------- Address ---------------------------------->
            <tr>
                <td>Address<br /><br /><br /></td>
                <td><textarea name="Address" rows="10" cols="50"></textarea></td>
            </tr>
            <!-------------------------- City ------------------------------------->
            <tr>
                <td>City</td>
                <td><input type="text" name="City" maxlength="50" placeholder="Pune" />
                    (Max 50 Characters Allowed)
                </td>
            </tr>
            <!----- -------------------- Pin Code-------------------------------------->
            <tr>
                <td>Pin Code</td>
                <td><input type="Number" name="PinCode" maxlength="6" placeholder="411041" />
                    (Max 6 Numbers Allowed)
                </td>
            </tr>
            <!---------------------------- State ----------------------------------->
            <tr>
                <td>State</td>
                <td><input type="text" name="State" maxlength="50" placeholder="Maharashtra" />
                    (Max 50 Characters Allowed)
                </td>
            </tr>
            <!------------------------------ Country --------------------------------->
            <tr>
                <td>Country</td>
                <td><input type="text" name="Country" placeholder="India" /></td>
            </tr>
            <!------------------------- Hobbies -------------------------------------->
            <tr>
                <td>Hobbies <br /><br /><br /></td>
                <td>
                    <input type="checkbox" name="HobbyDrawing" value="Drawing" />
                    Drawing
                    <input type="checkbox" name="HobbySinging" value="Singing" />
                    Singing
                    <input type="checkbox" name="HobbyDancing" value="Dancing" />
                    Dancing
                    <input type="checkbox" name="HobbyCooking" value="Cooking" />
                    Sketching
                    <br />
                    <input type="checkbox" name="HobbyOther" value="Other">
                    Others
                    <input type="text" name="Other_Hobby" maxlength="50" placeholder="Ex- Teaching" />
                    (Max 50 Characters Allowed)
                </td>
            </tr>
            <!-----------------------Qualification---------------------------------------->
            <tr>
                <td>Qualification <br /><br /><br /></td>
                <td>
                    <br />
                    <input type="checkbox" name="HighSchool" value="High School" />
                    High School(10th)<br>
                    <input type="checkbox" name="HigherSchool" value="Higher School" />
                    Higher School(12th)<br />
                    <input type="checkbox" name="Graduation" value="Graduation" />
                    Graduation(Bachelors)<br />
                    <input type="checkbox" name="PostGraduation" value="Post Graduation" />
                    Post Graduation(Masters)<br />
                    <input type="checkbox" name="Phd" value="Phd">
                    Phd
                </td>
            </tr>
            <!---------------------------- Courses ----------------------------------->
            <tr>
                <td>Courses<br />Applied For</td>
                <td>
                    <input type="radio" name="CourseBCA" value="BCA">
                    BCA(Bachelor of Computer Applications)<br>
                    <input type="radio" name="CourseBCom" value="B.Com">
                    B.Com(Bachelor of Commerce)<br>
                    <input type="radio" name="CourseBSc" value="B.Sc">
                    B.Sc(Bachelor of Science)<br>
                    <input type="radio" name="CourseBA" value="B.A">
                    BA(Bachelor of Arts)<br>
                    <input type="radio" name="CourseMCA" value="BCA">
                    MCA(Master of Computer Applications)<br>
                    <input type="radio" name="CourseMCom" value="B.Com">
                    M.Com(Master of Commerce)<br>
                    <input type="radio" name="CourseMSc" value="B.Sc">
                    M.Sc(Master of Science)<br>
                    <input type="radio" name="CourseMA" value="B.A">
                    MA(Master of Arts)<br>
                </td>
            </tr>
            <!----------------------- Submit and Reset ------------------------------->
            <tr>
                <td colspan="2" align="center">
                    <input type="submit" value="Submit">
                    <input type="reset" value="Reset">
                </td>
            </tr>
        </table>
        </form>
</body>
</html>
Output:
Download Student Registration Form in HTML with CSS
By clicking on the below download button you’ll be able to download the test.html file which consists of an HTML file. After opening this file using internet explorer the actual registration form will be displayed in the browser.
Steps for Creating a Student Registration Form in HTML with CSS
We’ll teach you how you can create an HTML project using easy and simple 5 steps:
1st Step: Choose an HTML Editor
Like you need a Microsoft word to edit a text file, similarly, an HTML Code Editor is needed to edit the HTML file. There are dozens of code editors present in the market but, I’ll prefer you to choose VS Code which is also called Visual Code and is created by Microsoft. You can also download VS Code from this link.
Why I’m recommending you to use VS Code because you can format the document using one click and VS Code also comes with a Live Server Extension. This extension is used to compile and run the HTML file which we coded in VS Code.
The VS Code also has some extraordinary functionalities like auto-completion of the code and the search-replace functionality. It also consists of some shortcut keys which copy the current line down so you don’t have to copy and paste the whole line.
2nd Step: Create your HTML File
After doing the setup of the code editor then the next step is to create one file with the extension .html. You have to tell the code editor that this is the file that I want to compile and run. For that, you’ve to create one folder on your PC, and then you’ve to import that folder into VS Code which is also called a working directory.
3rd Step: Start Writing the HTML Code
After importing the main HTML file in VS Code then start writing the HTML Code i.e Student Registration Form in HTML with CSS. First, write the HTML starter boilerplate, then add the link to the CSS file, then start writing the HTML code in the body tag.
Generally, the HTML form is made up of different HTML elements such as input fields, radio buttons, checkboxes, buttons such as submit and reset, etc. Every tag in HTML has its own functionality such as input types are used to accept the input from the user, radio buttons are used to select any one option from the two i.e gender male or female, etc.
Every HTML tag should always have its own closing tag. For example: if you write a tag such as <body> then there should always closing tag for body i.e </body>. HTML also consists of tags which can be closed by self also called as self-closing tags i.e <img/>, <br/> etc.
4th Step: Add Some Placeholders
The HTML input tags come with the functionalities called placeholders which are the text prompted inside the input fields. The placeholders tell users in which format they’ve to insert their text so that there will be no misinformation entered by the user.
In this form, we’ve added placeholders to each and every input tag i.e First name, Last Name, Email, Phone number, etc. You can also add your custom placeholder by changing the data entered inside the placeholder function tag.
5th Step: Compile the Code
Now After editing and writing the code you’ve to test your code to check whether the code you’ve written is working fine or not. For that, you’ve to add one extension in VS Code called “Live Server”. After installing these extensions Live Server option will come at the right bottom side of your VS Code. After clicking on that button your HTML File will start running on the port defined by the Live Server.
Now check whether the HTML File is working correctly or not.
Conclusion
In this way, we’ve learned how to create a student registration form in HTML with CSS. If you have any doubts then please feel free to contact us. We’ll resolve your doubts as soon as possible.
Thanks and Happy Coding 🙂
Also Read: