Hi Friends, today in this tutorial we’ll learn how to write HTML codes for Facebook login with CSS and also HTML code for Facebook login. You can download the source by clicking on the download button. But, before start writing the code we’ll tell you some information about Facebook. So,
Table of Contents
What is Facebook?
Facebook is an American social media company that is owned by the meta. The Facebook was founded by Mark Zuckerberg with some fellow Harvard students and roommates in the year 2004.
Facebook is one of the popular and widely used social media platforms. Nearly 60% of the total population is using Facebook to connect and chat with their friends.
HTML Codes for Facebook Login
The Facebook login page is very eye-catching so, every student or developer who is learning HTML and CSS should design this page as a project.
If you’re wondering about getting code for the Facebook login then don’t worry here you’ll get 100% working code with source code.
We’ll provide you only the images, HTML, and CSS code. As the buttons will not do any actions after clicking on them. If you want to perform any action after pressing the buttons then you’ve to write js code for it.
Now let’s see the actual coding part for HTML codes for Facebook Login.
HTML Code for Facebook Login
To design HTML Codes for Facebook Login you’ve to create some files and 1 folder for storing images which are:
- index.html
- responsive.css
- style.css
- images folder to store the required images
first, create an index.html file and then paste the below code into it. Keep in mind that Facebook changes the login page design continuously. So you also change the design as per your needs.
Note: We’ve shown only the HTML and CSS codes. If you want the images then please click on the download button given at the end of this post.
<!-- Learnprogramo - programming made simple -->
<!DOCTYPE html>
<html lang="en">
<head>
<meta charset="UTF-8">
<meta name="viewport" content="width=device-width, initial-scale=1.0">
<meta http-equiv="X-UA-Compatible" content="ie=edge">
<title>Facebook – log in or sign up</title>
<link rel="stylesheet" href="style.css">
<link rel="stylesheet" href="responsive.css">
<link rel="shortcut icon" type="image/x-icon" href="images/favicon.png">
</head>
<body>
<!-- ------------------------ header area ------------------------- -->
<header class="header-area">
<div class="container">
<div class="logo-area">
<a href="index.html"><img src="images/facebook.png" alt="Facebook"></a>
</div>
<div class="login-area">
<form action="#">
<div class="username-area">
<label for="username">Email or Phone</label>
<input type="text" id="username">
<input type="checkbox" name="" id="keepmelogin">
<label for="keepmelogin">Keep me logged in</label>
</div>
<div class="password-area">
<label for="password">Password</label>
<input type="password" id="password">
<span><a href="#">Forgot your password?</a></span>
</div>
<div class="submit-area">
<input type="submit" value="Log in">
</div>
</form>
</div>
</div>
</header>
<!-- ------------------------------ signup area ------------------- -->
<div class="signup-aria">
<div class="container">
<div class="left-area">
<div class="left-area-content">
<div class="left-text">Facebook helps you connect and share with the people in your life.</div>
<img src="images/social.png" alt="social image">
</div>
</div>
<div class="right-area">
<div class="title-area">
<h1>Create an account</h1>
<div class="sub-title">It's free and always will be.</div>
</div>
<div class="registration_container">
<form action="#">
<input type="text" name="" id="" placeholder="First name">
<input type="text" name="" id="" placeholder="Surname">
<input type="text" name="" id="" placeholder="Mobile number or email address">
<input type="password" name="" id="" placeholder="New password">
<div class="bday-title">Birthday</div>
<div class="birthday-selector">
<select name="birthday" id="day" title="Day">
<option value="">Day</option>
<option value="">1</option>
<option value="">2</option>
<option value="">3</option>
<option value="">4</option>
<option value="">5</option>
<option value="">6</option>
<option value="">7</option>
<option value="">8</option>
<option value="">9</option>
<option value="">10</option>
<option value="">11</option>
<option value="">12</option>
<option value="">13</option>
<option value="">14</option>
<option value="">15</option>
<option value="" selected="1">16</option>
<option value="">17</option>
<option value="">18</option>
<option value="">19</option>
<option value="">20</option>
<option value="">21</option>
<option value="">22</option>
<option value="">23</option>
<option value="">24</option>
<option value="">25</option>
<option value="">26</option>
<option value="">27</option>
<option value="">28</option>
<option value="">29</option>
<option value="">30</option>
<option value="">31</option>
</select>
<select name="birthday" id="month">
<option value="">Month</option>
<option value="">Jan</option>
<option value="">Feb</option>
<option value="">Mar</option>
<option value="">Apr</option>
<option value="" selected="1">May</option>
<option value="">Jun</option>
<option value="">Jul</option>
<option value="">Aug</option>
<option value="">Sep</option>
<option value="">Oct</option>
<option value="">Nov</option>
<option value="">Dec</option>
</select>
<select name="birthday" id="year" title="Year">
<option value="0">Year</option>
<option value="1">1995</option>
<option value="2" selected="1">1996</option>
<option value="3">1997</option>
<option value="4">1998</option>
<option value="5">1999</option>
<option value="6">2000</option>
<option value="7">2001</option>
<option value="8">2002</option>
<option value="9">2003</option>
<option value="10">2004</option>
<option value="11">2005</option>
<option value="12">2006</option>
<option value="13">2007</option>
<option value="14">2008</option>
<option value="15">2009</option>
<option value="16">2010</option>
<option value="17">2011</option>
<option value="18">2012</option>
<option value="19">2013</option>
<option value="20">2014</option>
<option value="21">2015</option>
<option value="22">2016</option>
<option value="23">2017</option>
</select>
<a href="">Why do I need to provide my date of birth?</a>
</div>
<div class="gender-selector">
<input type="radio" name="gender" id="female">
<label class="gen-sel-text" for="female">Female</label>
<input type="radio" name="gender" id="male">
<label for="male">Male</label>
</div>
<div class="last-text">
<p>By clicking Create an account, you agree to our <a href="#">Terms</a>
and confirm that you have read our <a href="#">Data Policy</a>, including
our <a href="#">Cookie Use Policy</a>Cookie Use Policy. You may receive SMS message notifications
from Facebook and can opt out at any time.</p>
</div>
<div class="submit-button">
<input type="submit" value="Create an account">
</div>
<p class="page"><a href="">Create a Page</a> for a celebrity, band or business.</p>
</form>
</div>
</div>
</div>
</div>
<!-------------------------------- footer area --------------------- -->
<footer class="footer-aria">
<div class="container">
<div class="f-top-area">
<ul>
<li><a href="#">English (UK)</a></li>
<li><a href="#">বাংলা</a></li>
<li><a href="#">অসমীয়া</a></li>
<li><a href="#">हिन्दी</a></li>
<li><a href="#">नेपाली</a></li>
<li><a href="#">Bahasa Indonesia</a></li>
<li><a href="#">العربية</a></li>
<li><a href="#">中文(简体)</a></li>
<li><a href="#">Bahasa Melayu</a></li>
<li><a href="#">Español</a></li>
<li><a href="#">Português (Brasil)</a></li>
<li><a href="#">+</a></li>
</ul>
</div>
<hr>
<div class="f-bottom-area">
<ul>
<li><a href="#">Sign Up</a></li>
<li><a href="#">Log In</a></li>
<li><a href="#">Messenger</a></li>
<li><a href="#">Facebook Lite</a></li>
<li><a href="#">Mobile</a></li>
<li><a href="#">Find Friends</a></li>
<li><a href="#">People</a></li>
<li><a href="#">Pages</a></li>
<li><a href="#">Places</a></li>
<li><a href="#">Games</a></li>
<li><a href="#">Locations</a></li>
<li><a href="#">Celebrities</a></li>
<li><a href="#">Marketplace</a></li>
<li><a href="#">Groups</a></li>
<li><a href="#">Recipes</a></li>
<li><a href="#">Sports</a></li>
<li><a href="#">Look</a></li>
<li><a href="#">Moments</a></li>
<li><a href="#">Instagram</a></li>
<li><a href="#">About</a></li>
<li><a href="#">Create ad</a></li>
<li><a href="#">Create Page</a></li>
<li><a href="#">Developers</a></li>
<li><a href="#">Careers</a></li>
<li><a href="#">Privacy</a></li>
<li><a href="#">Cookies</a></li>
<li><a href="#">AdChoices</a></li>
<li><a href="#">Terms</a></li>
<li><a href="#">Help</a></li>
</ul>
</div>
<div class="copyright-area">
<p>Facebook © 2022</p>
</div>
</div>
</footer>
</body>
</html>
To design the Html page you’ve to create a total of two CSS files. The first one is to make the page responsive and the second one is to design the HTML page.
Now to make the page responsive create a responsive.css file to store CSS code.
/* Learnprogramo - programming made simple */
/*------------- media query-------------*/
@media all and (max-width: 768px){
    .signup-aria{
        height: 820px;
    }
    .left-area{
        width: 100%;
        float: none;
    }
    .right-area{
        width: 100%;
    }
}
@media all and (max-width: 660px){
    .header-area .logo-area{
        width: 100%;
        float: none;
        text-align: center;
        margin-bottom: 30px;
    }
    .login-area form{
        float: none;
        margin: 0 auto;
        width: 400px;
    }
    .header-area .login-area{
        width: 100%;
    }
}
@media all and (max-width: 420px){
    .login-area form{
        width: 100%;
    }
    .login-area .username-area{
        float: none;
        overflow: hidden;
        margin-left: 0;
        margin-bottom: 20px;
    }
    .login-area .password-area{
        float: none;
        margin-left: 0;
        margin-bottom: 20px;
    }
    .login-area input[type="text"],
    .login-area input[type="password"]{
        width: 100%;
        font-size: 18px;
        padding: 5px;
    }
    .header-area{
        font-size: 16px;
    }
    .login-area .submit-area{
        padding-top: 0;
        margin-bottom: 10px;
    }
    .submit-area input{
        font-size: 16px;
        padding: 6px 12px;
    }
}
Now create another CSS file named style.css for styling the HTML page.
/* Learnprogramo - programming made simple */
body{
    margin: 0;
    font-family: arial;
}
/*-----------------------header area--------------------*/
.header-area{
    background-color: #3B5998;
    font-size: 12px;
    padding: 15px 0;
}
.container{
    width: 90%;
    margin: auto;
    max-width: 980px;
}
.header-area .logo-area{
    width: 20%;
    float: left;
}
.header-area .login-area{
    width: 80%;
    overflow: hidden;
}
.login-area{

}
.login-area form{
    float: right;
}
.login-area label{
    color: #FFFFFF;
    display: block;
}
label[for="keepmelogin"]{
    color: #73ABD8;
    margin-top: 7px;
}
.login-area input{
    display: block;
    margin-right: 10px;
    border: 1px solid #29487D;
}
.login-area .username-area{
    float: left;
    margin-left: 10px;
}
.login-area .password-area{
    overflow: hidden;
    float: left;
    margin-left: 10px;
}
.login-area .submit-area{
    overflow: hidden;
    float: left;
    padding-top: 13px;
}
.submit-area input{
    background: #5976AD;
    color: white;
    padding: 2px 5px;
}
input[type="checkbox"]{
    float: left;
    margin-left: 0;
    margin-top: 7px;
}
.password-area a{
    color: #73ABD8;
    text-decoration: none;
    margin-top: 7px;
    display: block;
}
.login-area input[type="text"],
.login-area input[type="password"]{
    padding: 2px;
}
.password-area a:hover{
    text-decoration: underline;
}
hr{
    border-top: 1px solid #DDDFE2;
    border-right: 0;
    border-bottom: 0;
    border-left: 0;
}
/*-----------------------------signup area--------------------*/
.signup-aria{
    height: 596px;
    padding-top: 40px;
    background: linear-gradient(#FEFEFF, #D3D8E8);
}
.left-area{
    float: left;
    width: 60%;
    overflow: hidden;
}
.left-area-content{
    padding-right: 100px;
}
.left-area-content .left-text{
    color: #0e385f;
    font-size: 20px;
    font-weight: bold;
    word-spacing: -1px;
}
.left-area-content img{
    width: 100%;
}
.right-area{
    float: right;
    width: 40%;
}
.right-area h1{
    margin-top: 0;
    color: #333333;
    font-family: Helvetica, Arial, sans-serif;
    font-size: 36px;
    font-weight: bold;
    margin-bottom: 1px;
}
.title-area{
    padding-top: 20px;
    padding-bottom: 20px;
}
.sub-title{
    color: #1d2129;
    font-size: 19px;
    font-weight: normal;
}
.registration_container{

}
.right-area input[type="text"],
.right-area input[type="password"]{
    display: block;
    margin-bottom: 10px;
    border: 1px solid #BDC7D8;
    width: 100%;
    box-sizing: border-box;
    color: #9999B3;
    font-size: 18px;
    padding: 8px 10px;
    border-radius: 5px;
}
.right-area input[type="text"]:nth-of-type(1){
    width: 48%;
    float: left;
    margin-right: 4%;
}
.right-area input[type="text"]:nth-of-type(2){
    width: 48%;
    overflow: hidden;
}
.bday-title{
    color: #1d2129;
    font-size: 18px;
    font-weight: normal;
    margin-bottom: 5px;
    margin-top: 10px;
    font-family: Helvetica, Arial, sans-serif;
}
.birthday-selector{
    overflow: hidden;
}
.birthday-selector select{
    padding: 5px;
    height: 30px;
    font-size: 13px;
    border: 1px solid #bdc7d8;
    float: left;
}
.birthday-selector a{
    color: #73ABD8;
    text-decoration: none;
    font-size: 11px;
    color: #365899;
    line-height: 1.34;
    display: block;
    overflow: hidden;
    max-width: 150px;
}
.birthday-selector a:hover{
    text-decoration: underline;
}
.birthday-selector select:last-of-type{
    margin-right: 10px;
}
.gender-selector{
    margin-top: 15px;
}
.gen-sel-text{
    color: #1d2129;
    font-size: 18px;
    font-weight: normal;
    line-height: 18px;
    padding: 0 10px 0 3px;
}
.last-text p{
    color: #777;
    font-size: 11px;
    width: 316px;
    margin: 1em 0;
}
.last-text p a{
    text-decoration: none;
}
.last-text p a:hover{
    text-decoration: underline;
}
.submit-button input{
    font-size: 19px;
    font-family: 'Freight Sans Bold', Helvetica, Arial, sans-serif !important;
    font-weight: bold !important;
    text-rendering: optimizeLegibility;
    min-width: 194px;
    padding: 7px 20px;
    text-align: center;
    line-height: 126%;
    background: linear-gradient(#67ae55, #578843);
    background-color: #69a74e;
    box-shadow: inset 0 1px 1px #a4e388;
    border-color: #3b6e22 #3b6e22 #2c5115;
    border-radius: 5px;
    color: #fff;
    cursor: pointer;
    display: inline-block;
    position: relative;
    text-shadow: 0 1px 2px rgba(0,0,0,.5);
    margin-top: 10px;
    margin-bottom: 10px;
}
.page{
    color: #666;
    font-size: 13px;
    font-weight: bold;
    margin-top: 10px;
    padding-top: 15px;
}
.page a{
    text-decoration: none;
}
/*----------------------------footer area-----------------*/
.footer-aria{

}
.f-top-area{
    overflow: hidden;
}
.f-top-area ul{
    list-style: none;
    padding: 0;
}
.f-top-area ul li{
    float: left;
    margin-right: 10px;
}
.f-top-area ul li a{
    text-decoration: none;
    color: #365899;
    cursor: pointer;
    text-align: left;
    font-size: 12px;
    border-collapse: collapse;
    border-spacing: 0;
    line-height: 20px;
    white-space: nowrap;
}
.f-top-area ul li:last-child{
    background-color: #f6f7f9;
    border: 1px solid #ced0d4;
}
.f-top-area ul li:last-child a{
    color: #4b4f56;
    font-size: 18px;
    height: 18px;
    line-height: 18px;
    padding: 2px 8px;
}
.f-bottom-area{
    overflow: hidden;
}
.f-bottom-area ul{
    padding: 0;
    list-style: none;
    width: 90%;
}
.f-bottom-area ul li{
    float: left;
    width: 85px;
}
.f-bottom-area ul li a{
    text-decoration: none;
    color: #365899;
    cursor: pointer;
    text-align: left;
    font-size: 12px;
    border-collapse: collapse;
    border-spacing: 0;
    line-height: 20px;
    white-space: nowrap;
}
.copyright-area p{
    font-size: 11px;
    color: #737373;
}
Output:
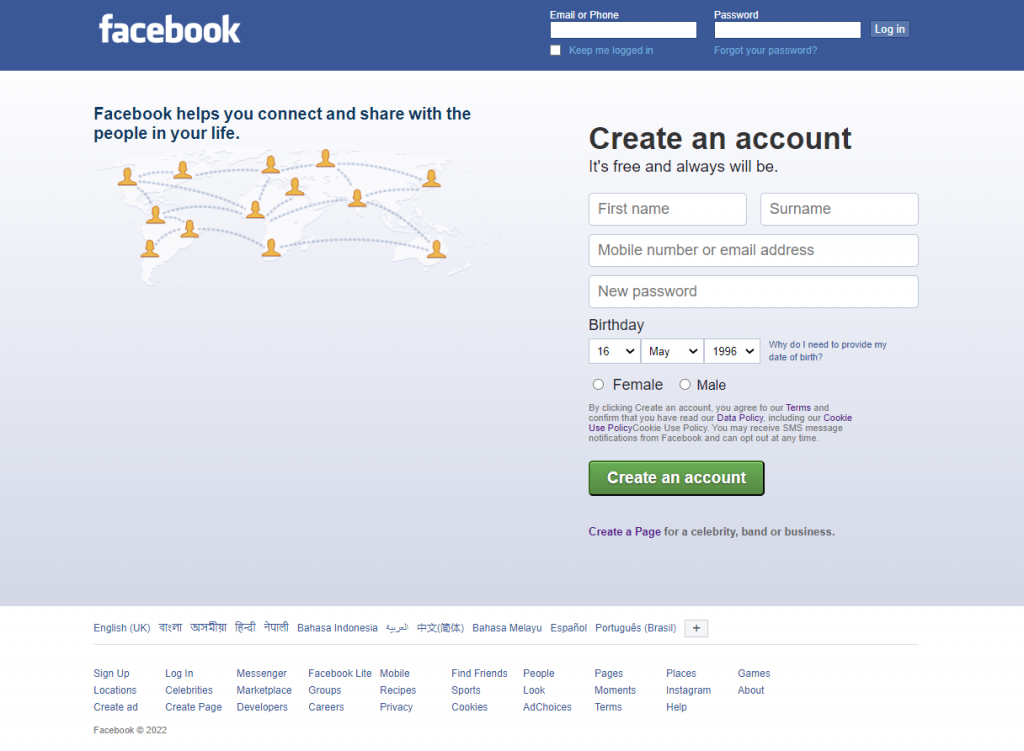
Download HTML Codes for Facebook Login
By clicking on the below download button you’ll be able to download all the files which consist of an HTML file, 2 CSS files, and an images folder. After opening the index.html file using internet explorer the actual Facebook login page will be displayed in the browser.
Steps for Creating HTML Code for Facebook Login
We’ll teach you how you can create an HTML project using easy and simple 5 steps:
1st Step: Choose an HTML Editor
Like you need a Microsoft word to edit a text file, similarly, an HTML Code Editor is needed to edit the HTML file. There are dozens of code editors present in the market but, I’ll prefer you to choose VS Code which is also called Visual Code and is created by Microsoft. You can also download VS Code from this link.
Why I’m recommending you to use VS Code because you can format the document using one click and VS Code also comes with a Live Server Extension. This extension is used to compile and run the HTML file which we coded in VS Code.
The VS Code also has some extraordinary functionalities like auto-completion of the code and the search-replace functionality. It also consists of some shortcut keys which copy the current line down so you don’t have to copy and paste the whole line.
2nd Step: Create your HTML File
After doing the setup of the code editor then the next step is to create one file with the extension .html. You have to tell the code editor that this is the file that I want to compile and run. For that, you’ve to create one folder on your PC, and then you’ve to import that folder into VS Code which is also called a working directory.
3rd Step: Start Writing the HTML Code
After importing the main HTML file in VS Code then start writing the HTML Code i.e Facebook login page in HTML with CSS. First, write the HTML starter boilerplate, then add the link to the CSS file, then start writing the HTML code in the body tag.
Generally, the HTML form is made up of different HTML elements such as input fields, radio buttons, checkboxes, buttons such as submit and reset, etc. Every tag in HTML has its own functionality such as input types are used to accept the input from the user, radio buttons are used to select any one option from the two i.e gender male or female, etc.
Every HTML tag should always have its own closing tag. For example: if you write a tag such as <body> then there should always closing tag for body i.e </body>. HTML also consists of tags which can be closed by self also called as self-closing tags i.e <img/>, <br/> etc.
4th Step: Add Some Placeholders
The HTML input tags come with the functionalities called placeholders which are the text prompted inside the input fields. The placeholders tell users in which format they’ve to insert their text so that there will be no misinformation entered by the user.
In this form, we’ve added placeholders to each and every input tag i.e First name, Last Name, Email, Phone number, etc. You can also add your custom placeholder by changing the data entered inside the placeholder function tag.
5th Step: Compile the Code
Now After editing and writing the code you’ve to test your code to check whether the code you’ve written is working fine or not. For that, you’ve to add one extension in VS Code called “Live Server”. After installing these extensions Live Server option will come at the right bottom side of your VS Code. After clicking on that button your HTML File will start running on the port defined by the Live Server.
Now check whether the HTML File is working correctly or not.
Conclusion
In this way, we’ve learned how to write HTML codes for Facebook Login using CSS. If you have any doubts then please feel free to contact us. We’ll resolve your doubts as soon as possible.
Thanks and Happy Coding 🙂
Also Read: