Table of Contents
How to Add Tomcat Server in Eclipse
- Download the Tomcat.
- Extract the downloaded Tomcat Zip File.
- Open Eclipse IDE.
- Go to Window and select preferences.
- Expand Server and select Runtime Environments.
- Select Server in the Eclipse IDE with suitable version.
- Give a name to the Server.
- Tomcat is added to the list.
The above are the steps that should be followed in order to install tomcat in your Eclipse IDE. Now we will see the above-given steps for How to add tomcat server in eclipse in detail.
The Eclipse IDE comes with different versions such as Oxygen, Luna, Kepler, Photon etc. Similarly, Tomcat also comes with different versions like tomcat 7, tomcat 9 etc.
But make sure that during the installation of Eclipse Don’t choose Eclipse for java developers because there is no option for servers tab in Eclipse. So choose Eclipse IDE for EE developers.
download tomcat 7 for eclipse and apache tomcat v8 0 download for eclipse is the same thing because during installation you can choose your version on your own.
before installing the Eclipse and tomcat there should be JDK(Java Development Kit) installed in your computer or laptop.
Let us see step by step process to download JDK in your laptop or PC.
How to Download JDK in Your PC.
1st Step: Visit Oracle’s official website and search for JDK.
2nd Step: Find a Suitable Version of Java JDK SE Development Kit.
3rd Step: Make sure you grab the windows version.
4th Step: Now Download the JDK and install it in your PC.
5th Step: Now set the path for the JDK in My Computer.
After installing and configuring the JDK its time to install the eclipse and tomcat. Let us see step by step process for How to Install Tomcat in Eclipse.
Step by Step Process for How to Install Tomcat in Eclipse
Step 1: Download the Tomcat
Your first step will be to download the tomcat from the official website of Tomcat. You can download Tomcat Windows Installer or can download Zip file for installation. If your operating system is windows then you have two options like 32 bit and 64 bit.
Download the Zip file according to your suitable version.
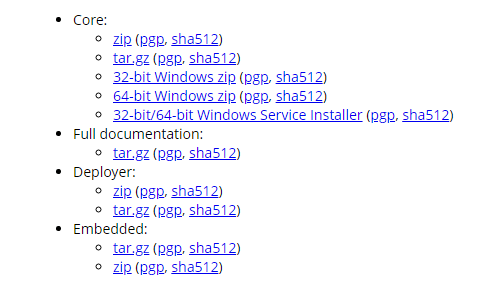
Step 2: Extract the Zip File
After downloading the zip file from the official website extract the downloaded zip file by specifying the folder path.
Step 3: Open the Eclipse IDE
Now open the Eclipse IDE from the Start Menu and the Eclipse IDE will be opened on the screen.
Step 4: Click on Window and Select Preferences
After opening the Eclipse IDE Click on Window Option on the top left corner of an Eclipse IDE and select Preferences.
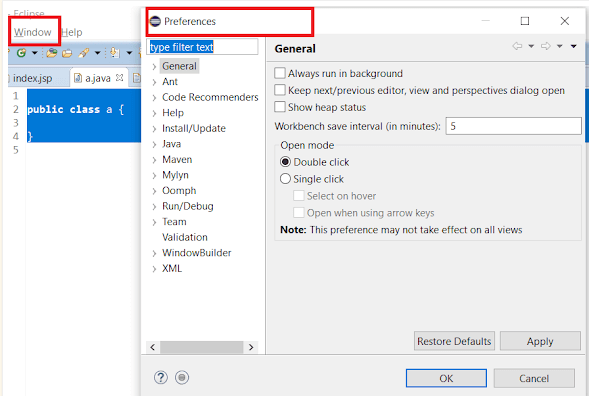
Step 5: Expand Server and Select Runtime Environments
After Clicking on Preferences the new tab will appear. Now Expand the Server option and then select Runtime Environments. Click on Add to add a server in runtime Environment.
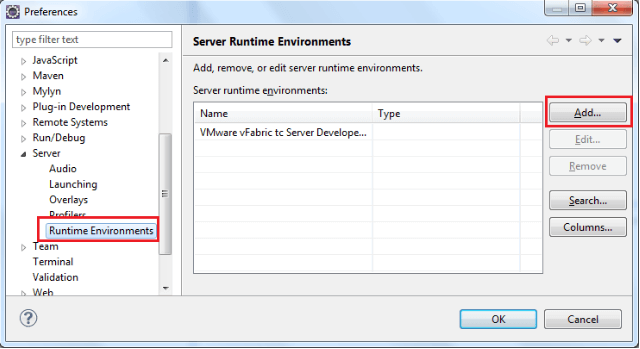
If Eclipse Server Tab missing then Read This Documentation.
Step 6: Select Server in Eclipse IDE with Suitable Version
After Clicking on Add a new window will appear on the screen. Now select suitable Tomcat version from the list and press on Next.
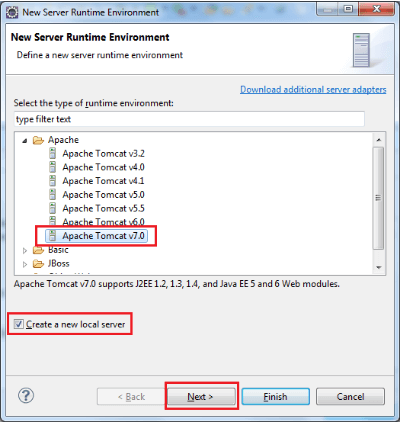
If Apache Tomcat not Showing in eclipse server runtime environments then Click Here.
Step 7: Give a Name to the server
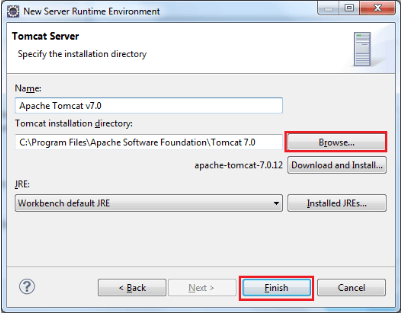
After Clicking on next a new window will open where you should give a name to the server and click on browse to specify the location of the directory. Now click on Finish.
Step 8: Tomcat is added to the List.
When you click on finish, your specified tomcat version had been added to the list of the server runtime environment. Now press Ok.
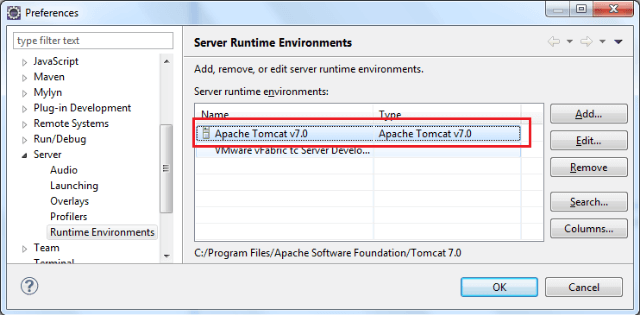
Now New Tomcat server has been added in the Eclipse. This is one of the type of Tomcat Plugin for eclipse.

What is apache Tomcat?
Apache Tomcat is an API for implementing a durable open-source Java servlet container, implemented by Apache Apache Spark, one of the most popular and durable open-source Java servlets and containers.
It started out as an Apache 2.0 version of Apache Spring and was later released as a full-fledged Apache 3.1 version in 2010.
Although Apache Tomcat is one of the most popular and durable open-source Java servlets and containers.
It is still the largest and most widely used Java server in the world, with a well-tested and proven core engine and a wide range of features.
Mechanism:
The mechanism is as follows: It provides a robust, reliable and reliable Java service container for use as a stand-alone web server.
It is necessary to configure the primary webserver to process connections to the user and run as a standalone Java service container in the same environment as the Java application.
It is one of the most popular and durable open-source Java servlets and containers published by the Apache Software Foundation.
As already mentioned, it is possible to keep Tomcat lightweight and upload add-ons as needed. Therefore, Tomcat implements a JSP servlet, which is basically a standard Java EE engine that many applications tend to rely on.
Apache Tomcat is a widely used application, but it is neither a “Java EE” engine nor an “Application Server.”
Apache can handle both static and dynamic content, and Tomcat can handle JSP, but it is not a Java EE engine.
Tomcat enables a pure Java web server environment by combining Java-based technologies to run applications created with the Java programming language.
Tomcat provides a single, open-source, powerful, low latency environment for Java code execution.
Development:
Tomcat is developed and maintained by an open community of developers and released under the Apache 2.0 license. Tomcat was developed, maintained and kept open by the open and community developers.
Servlet containers are an implementation of the Java servlet specification, which is mainly used to host Java servlets.
Tomcat 4.0 has been released, and tomcat 8.5 supports several new features of HTTP 2.1 but remains a servlet 3 container, as well as support for a number of new Java services.
A web server is a server designed to serve files on the local system through Apache and for the web as a whole, as well as for other applications.
It supports several JavaScript-based technologies, including the Apache JServ Protocol (AJP) interface, where the vulnerability exists.
The binary A JP protocol, essentially a connector, allows a Tomcat servlet container called Catalina to communicate with a web application to support advanced functionality on a website.
Growth:
Tomcat grew out of the Apache Jakarta Project and is an application server designed to run Java servlets and render web pages with Java server page encoding.
With an accessible version of the binary source code, it is used to power a wide range of applications and websites on the Internet.
At the time of writing there is definitely a vulnerability in the binary version of Tom catcat, as well as in an open-source version.
But their web application security team has discovered the vulnerability using Qualys Web Application Scanning (WAS).
They discovered a vulnerability called Ghostcat, which they tracked with CVE-2020 – 1938 and rated with a CVSS v3 score of 9.8. If you haven’t done it yet, just give it a try, it’s free and available for download on their website.
Apache Tomcat software is developed in an open and participatory environment and released under the Apache 2.0 license.
The Apache JServ Protocol (AJP) is used for communication between Tomcat and Apache web servers.
The Apache Tom Cat web server is often used for Java-based web applications such as webmail, email, social media and other applications.
